What TPI means on a saw blade
August. 19, 2025
TPI stands for Teeth Per Inch, which tells me how many teeth sit along one inch of a saw blade. I have learned that TPI plays a big role in how smooth or fast a cut will be. Industry studies show that TPI can directly affect cutting force and efficiency.
Key Takeaways
TPI measures how many teeth fit in one inch of a saw blade and affects cutting speed and smoothness.
Choose higher TPI blades for thin or hard materials to get cleaner cuts and lower TPI blades for thick or soft materials to cut faster.
Always match TPI, tooth shape, and blade material to the material and thickness to improve cut quality, prevent damage, and extend blade life.
TPI Basics
What Is TPI
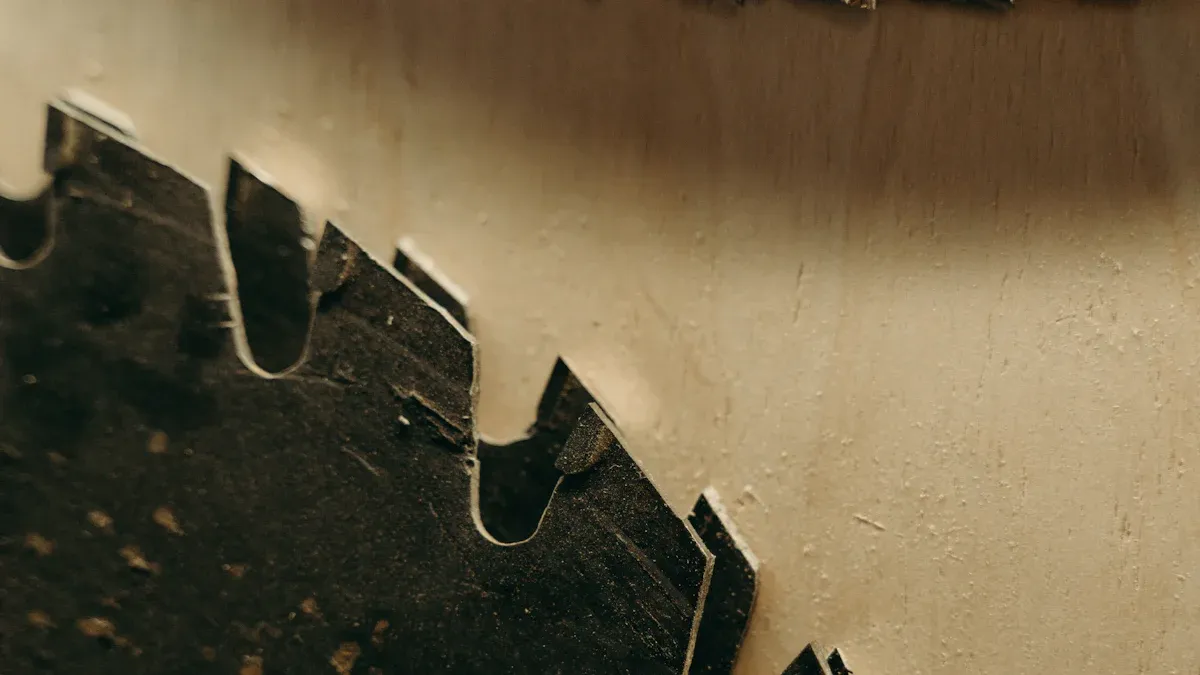
When I look at a saw blade, I notice the teeth along its edge. TPI, or Teeth Per Inch, measures how many teeth fit within one inch of the blade’s surface. For example, a blade with 14 TPI has 14 teeth in every inch. This measurement applies to many types of saw blades, including those for handheld and power tools. TPI helps me understand how the blade will perform with different materials.
How TPI Affects Cutting
I have found that TPI directly impacts both the smoothness and speed of a cut. Blades with a higher TPI have finer teeth. These blades produce cleaner and more precise cuts, especially on hard materials like metal or plastic. However, they cut slower because the teeth are smaller and remove less material with each stroke. On the other hand, blades with a lower TPI have larger teeth. These blades cut faster and work well for thick or soft materials, but they leave a rougher edge. I always make sure at least three teeth contact the material during cutting. This reduces vibration and helps prevent blade damage.
Tip: Choosing the right TPI improves safety by preventing blade binding and overheating.
TPI Ranges
Saw blades come in a wide range of TPI values. Low TPI blades (6–18) are best for rough cuts and thick materials. Medium TPI blades (18–24) balance speed and smoothness for general use. High TPI blades (24+) are ideal for thin materials and fine cuts. Some blades feature variable TPI, which means the number of teeth changes along the blade. This design gives me more versatility for different cutting tasks.
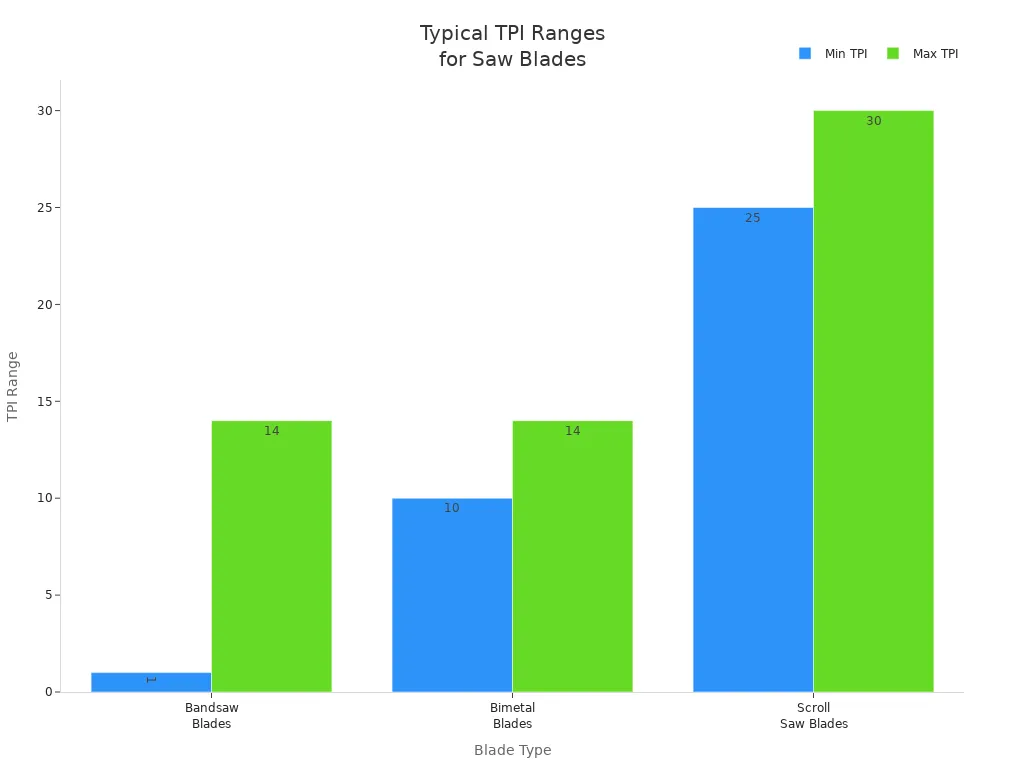
| Blade Type | Typical TPI Range | Application / Cutting Characteristics |
1 to 14 TPI | Coarse (2-4 TPI) for rough cuts and thick materials; fine (14 TPI) for smooth cuts on thin materials | |
Bimetal Blades | 10 to 14 TPI | Fine cutting with smooth finish |
25 to 30 TPI | Very fine, intricate work on thin materials |
TPI for Materials
Wood Cutting
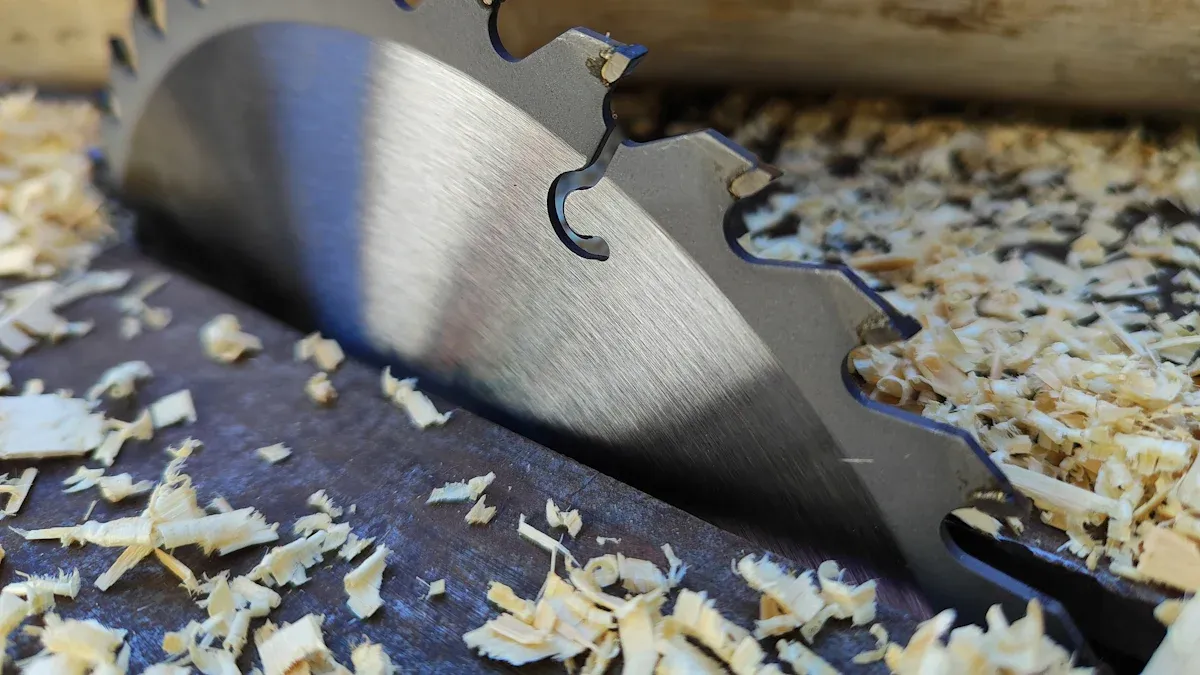
When I choose a saw blade for wood, I always check the TPI first. The right TPI depends on whether I am ripping or crosscutting and on the type of wood. For softwood, I use blades with a TPI range of 10 to 18. These blades cut quickly and clear chips well, which helps when I rip along the grain. For hardwood, I prefer blades with 18 to 24 TPI. This range gives me smoother cuts and less splintering, especially when I crosscut across the grain.
Here is a table that shows how TPI affects wood cutting:
Blade TPI | Cutting Speed | Cut Quality | Typical Use Case for Wood Cutting |
|---|---|---|---|
Low TPI (24 or fewer) | Faster cutting due to larger tooth bites | Rougher cuts with more aggressive material removal | Ripping wood along the grain for speed over finish quality |
High TPI (40+) | Slower cutting due to smaller tooth bites | Smoother, cleaner cuts with less splintering | Crosscutting wood across the grain or cutting thin materials |
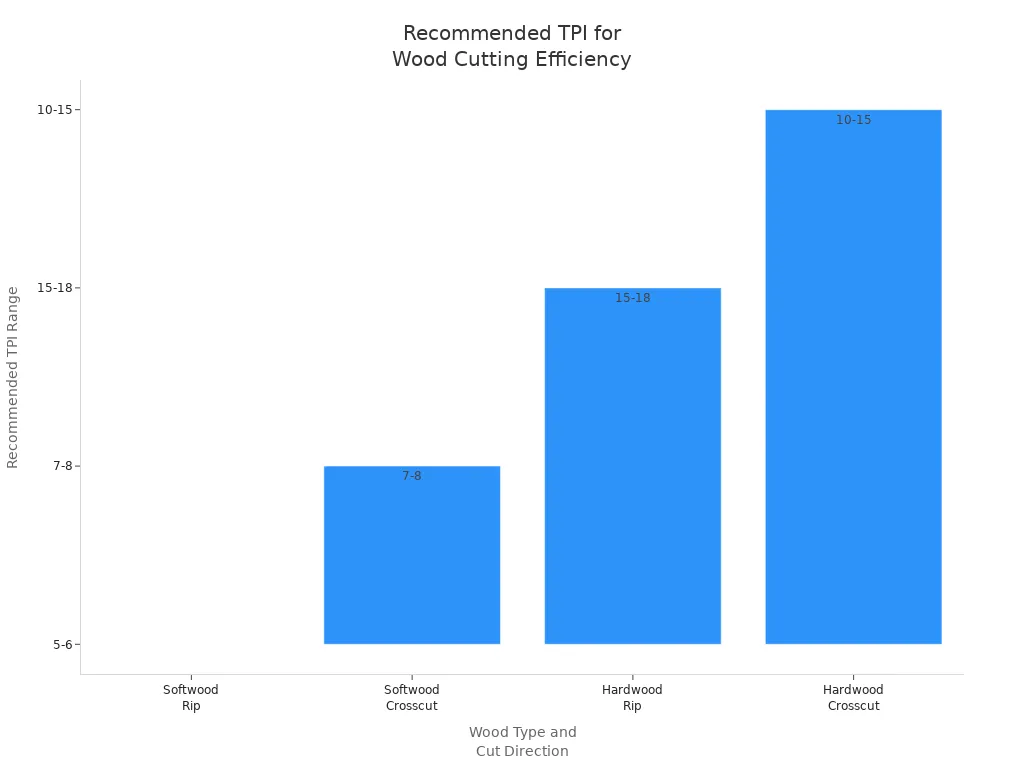
I notice that lower TPI blades work best for ripping wood, while higher TPI blades excel at crosscutting and finishing. The chart below shows recommended TPI ranges for ripping and crosscutting softwood and hardwood:
When I work with thick hardwoods, I use blades with 3-6 TPI for fast, rough cuts. For medium-density woods, I pick blades with 8-14 TPI to balance speed and finish. Thin hardwoods and veneers require 18-24 TPI for smooth, precise cuts. I learned that using the correct TPI prevents overheating and rough edges.
Metal and Aluminum
Cutting metal and aluminum requires a different approach. I always match the TPI to the thickness of the material. For thin metals like sheet metal, I use high TPI blades (14-36). These blades give me cleaner cuts and protect the teeth from damage. For thick metals such as steel pipes, I switch to low TPI blades. This choice allows for aggressive cutting and better chip clearance.
Here is a table that summarizes TPI selection for metal:
Metal Thickness | Recommended TPI | Reasoning |
|---|---|---|
Thin Metal (sheet metal) | High TPI | Cleaner cuts, prevents tooth damage |
Thick Metal (pipes, tubing) | Low TPI | Aggressive cutting, better chip clearance |
When I cut aluminum, I pay close attention to both TPI and blade material. For aluminum less than 1/8 inch thick, I use blades with 18 to 32 TPI. For thicker pieces, I choose blades with lower TPI, such as 6 to 10 for pieces up to 3 inches. I always follow the "3-Tooth Rule," making sure at least three teeth are engaged in the material to avoid tooth stripping and ensure efficient cutting.
Here is a chart that shows recommended TPI ranges for cutting aluminum by thickness:
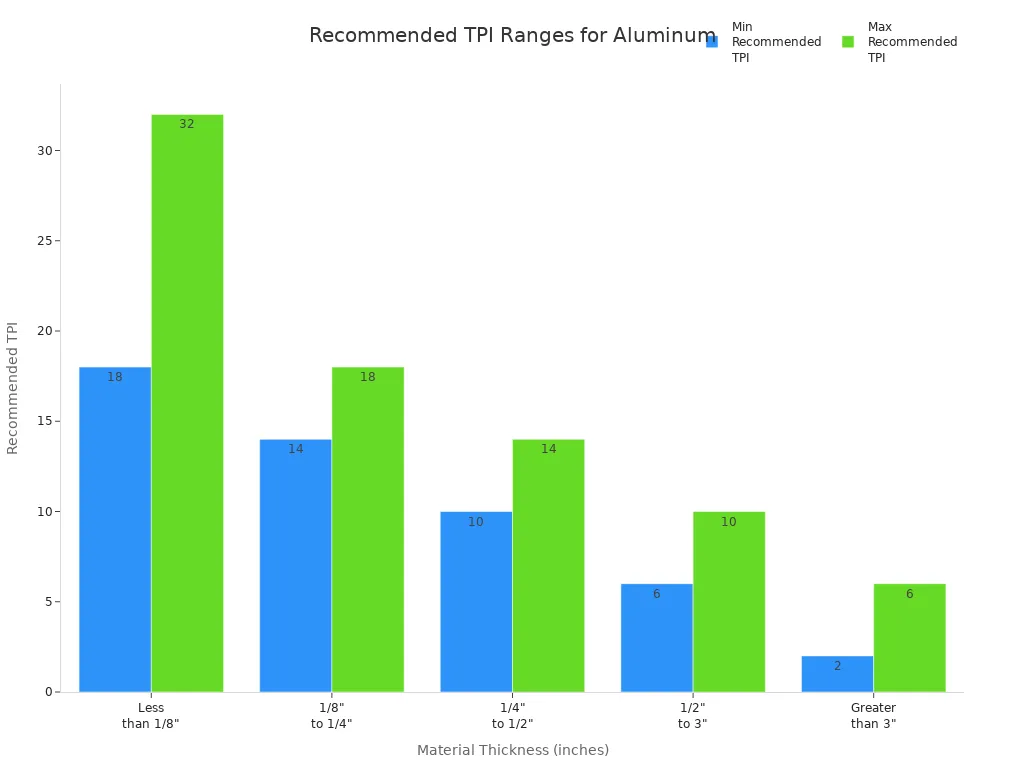
I also learned that using the correct TPI for aluminum reduces cutting stress and extends blade life. Blade material and tooth shape matter too. For example, bi-metal or carbide-tipped blades with a Triple Chip Grind tooth shape last longer and produce cleaner cuts.
Other Factors
Several other factors influence how TPI affects cutting performance. Tooth shape plays a big role. I find that blades with larger gullets and coarser teeth clear chips faster, which helps when I cut thick materials. Finer teeth with smaller gullets work better for thin materials and produce smoother cuts.
Blade material also matters. I use high-speed steel blades for general tasks. For tougher jobs, I switch to carbide-tipped or bi-metal blades. These blades last longer and handle heat better, especially when I cut metal or hardwood.
Here is a table that compares blade materials and their uses:
| Blade Material | Key Properties | Cutting Applications |
High-Speed Steel (HSS) | Economical, versatile | Ordinary cutting tasks |
Carbide-Tipped | Resilient, heat-resistant | Tough materials like metal and hardwoods |
Bi-Metal | Flexible, durable | Metal and wood, longer lifespan than steel blades |
Diamond-Tipped | Exceptionally durable, wear-resistant | Abrasive materials such as concrete, stone, tile |
Variable pitch blades offer more versatility than constant pitch blades. I use variable pitch blades when I need to cut different material thicknesses. These blades reduce vibration and improve cut quality by balancing debris removal and smooth incisions.
Tip: Always match TPI, tooth shape, and blade material to the material and thickness for the best results.
If I choose the wrong TPI, I risk poor finish quality, slow cutting, blade clogging, and even blade damage. I always check that at least two or three teeth engage the material during cutting. This practice helps me avoid vibration and extends blade life.
I always match the blade to the material and cut for the best results. The table below shows how choosing the right blade features improves cut quality and tool life:
| Material Type | Recommended TPI Range | Blade Feature Considerations |
Thin Metal Sheets | Finer teeth for cleaner cuts | |
Thick Metals | 8-10 | Lower TPI for faster cuts |
Plastics/Composites | 14-18 | Fine teeth to prevent chipping |
I check blade width, tooth design, and material to get smooth, efficient cuts every time.
FAQ
What does variable TPI mean on a saw blade?
I see variable TPI as a blade with different tooth counts along its length. This design helps me cut various materials smoothly and reduces vibration.
What happens if I use the wrong TPI for a material?
If I pick the wrong TPI, I get rough cuts, slow progress, or even blade damage. I always match TPI to the material for best results.
What is the "3-Tooth Rule" in saw blade use?
● I follow the "3-Tooth Rule" by making sure at least three teeth touch the material. This prevents vibration and helps me get cleaner, safer cuts.